Customizable Gesture-Based Assistive Control System
2020 Fall ECE M202A/CS M213A Embedded Systems Final Project
Project maintained by aksh98md Hosted on GitHub Pages — Theme by mattgraham
Andrew Ho, Tu Yu Hsien, Jessica Bojorquez
1. Abstract
A new gesture based embedded system is proposed that acts as an alternative assistive input for personal computers (PCs). The sensor inputs from a web camera and Arduino are collected by a Raspberry Pi, where image recognition and data processing is performed in real time, and corresponding events are sent to the PC wirelessly to realize with minimal delay. This system is a standalone device that consists of the Raspberry Pi, Arduino and a web camera as aforementioned, and includes BLE and Wi-Fi connectivity. On the PC side, users are able to specify the mapping of specific functionalities and keystrokes to the recognized gestures, allowing for customization based on their preferences and common actions. Although similar systems have been implemented before, the novelties in the system proposed are the use of video for gesture input instead of ultrasonic data, the customizability of control tailored to each user, and the portability of the wireless device.
2. Introduction and Proposal
As computer usage has increased due to the move to remote learning and working, methods to improve workflow through human computer interaction can be explored. One method of doing so is to enhance the methods of input for personal computers. For certain tasks, instead of using a conventional mouse and keyboard, which can be performed through a tedious series of clicks or a complicated keyboard shortcut for performing simple tasks, such as controlling music playback or capturing a screenshot. Therefore, this project explores the possibility of using gesture and other sensor-based input methods through the use of a separate embedded companion device. This device should allow for controls of computer functionalities through simple gestures recognized by the camera, which is parsed on device locally and transmitted through a command to the computer.
The device is composed of four components: the main personal computer, Raspberry Pi, Arduino Nano 33 BLE Sense, and a USB web camera. The following figure below demonstrates the interaction between them:
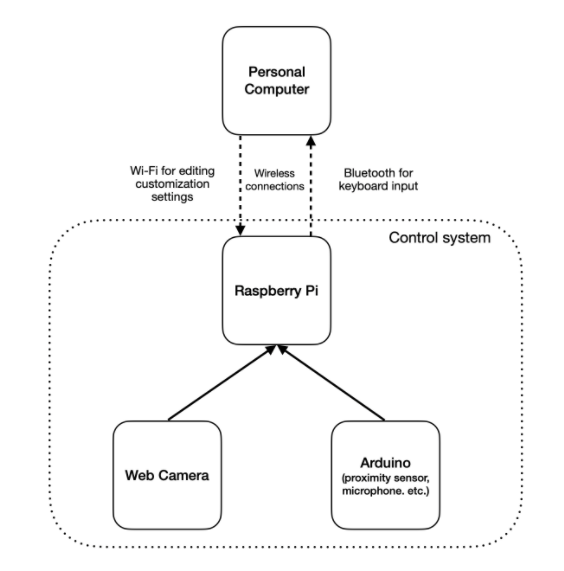
The Raspberry Pi acts as a central control for the system, and the web camera and Arduino are connected to the Raspberry Pi to feed inputs into it. The Raspberry Pi takes in the continuous video stream of the web camera and sensor data and continuously runs static image recognition with OpenCV. This is done locally to reduce the processing load on the PC and prevent any heavy network usage when unneeded. Sensors on the Arduino are used to assist with the gesture controls, most importantly preventing false positives in triggering of recognition, which can be activated through the detection of a hand with the proximity sensor or a voice activated method, which would require an either an outgoing internet connection to call voice recognition APIs or be performed locally.
Once a gesture is detected, it performs the specified task previously defined by the user, by default sending a set of keystrokes to the computer, which recognizes the Raspberry Pi as a keyboard input source. Examples of this flow would be to map gestures to perform screenshots, control online presentation slides, mute and unmute video calls, adjust volume, and play, pause, and other actions in regards to multimedia playback. These specific settings are stored on the Raspberry Pi and can be accessed through the PC to adjust them.
3. Prior Works
A basic hand gesture control system for PC applications
This paper explores the problems that can come up when exploring computer applications that are controlled via gestures that are both composed of static symbols and dynamic motions [1]. The dynamic motion model they use in this paper is done in real time and with a linear-in-parameter dynamic system, which is a linear state space model whose dynamics vary as a function of certain time-varying parameters called scheduling parameters. Some of the computer programs that this paper aims to control with hand gestures are browsers and PowerPoint, but they express that this can be expanded to other applications and other I/O forms as well, such as mouse, keyboard and voice. Some of the benefits of such system are that these interfaces can by used by the many people who cannot adequately use typical computer interaction techniques, while at a low common cost.
Arduino based Hand Gesture Control of Your Computer
This is a project that use an Arduino to implement a hand getsture control. Some of the functionality they experimented with was switching between tabs, scrolling on a webpage, shifting between applications, and video commands. Ultrasonic Sensors, an Arduino, and a few connecting wires were used to detect hand gestures and feed into the computer. The program ran by the arduino used in this project converts distances measured by the sensors and applies them to the appropiate commands. Some of the complications they found were the distance between the hand gesture and the Ultrasonic Sensors. [2]
Robust Part-Based Hand Gesture Recognition Using Kinect Sensor
This prior work focuses on building a robust part-based hand gesture recognition systems using Kinect sensor [3]. As stated in this prior work “, the hand is a smaller object with more complex articulations and more easily affected by segmentation errors”, hence this paper explores potential solutions for some of these errors. This paper also attempts to solve the problem of differnt hand shapes by applying the distance metric, Finger-Earth Mover’s Distance. The Finger-Earth Mover’s Distance is a distance metric that treats each finger as a cluster and penalize the empty finger-hole. This helps in the case that it the sensor may only match finger parts and not the whole hand, and it helps better distinguish the hand gestures that have slight differences. [3]
Training a Neural Network to Detect Hand Gestures with OpenCV in Python
This article shows the way to detect some simple hand gesture by using Python and Opencv to capture the image. The paper mainly focus on how to train the model from the large picture set get from Kaggle (Also, we could use our own dataset instead, this will increase the amount of gestures we can detect) and turn to its CNN network. The trained model used Opencv to capture our gesture image and translate to the CNN to decide which gesture are we showing and what function should reach out base on the image it get. It is a way to achieve hand gestures since the Resberry pi we are going to use is also good with Python. [4]
Install OpenCV 4 on your Raspberry Pi
A guidline on how to install opencv on the Resberry Pi to do image detection, and set the environment for the board to run correctly.[5]
4. Technical Approach and Implemenetation
Why Raspberry Pi and Arduino?
Arduino is a microcontroller, it does not run an operating system but it is power efficient. Raspberry Pi is a full computer, we set up our arduino in the Raspberry Pi. Combined together, Raspberry pi offers a friendly environment for developing code, while Arduino handles precise real-time control of the motors.
5. Hardware set up
Raspberry Pi

Raspberry Pi is a single board computer that has an ARMv6 700 MHz single-core processor, a VideoCore IV GPU and 512MB of RAM. For data storage and operating system, it uses an SD card. The OS installer used for our RPi3 was New Out Of Box Software (NOOBS), which allowed us to install a working Operatins System. The working OS that we isntalled is Raspbian, which is a lightweight linux OS based on Debian. The Raspberry Pi used for this project is Raspberry Pi 3 Model B+ (RPi3). [6] Although it is possible for a 64-bit operating system to be installed in our RPi3, the 32-bit operating system was used, as it is also the OS that the RPi3 chooses by default. The 64-bit operating system could have been installed later, but the 32-bit seemed to work fine. The benefit of having a 64-bit operatin system is that the OS can access 264 memory addresses, which is 18-Quintillion bytes of RAM, more than 4 GB of RAM. [7] A 64-bit processor will store more computational values and handle more data at once when compared to a 32-bit processor. This means that it will access more than four billion times the physical memory of a 32-bit processor. [8]
Our team opted to use Python for our learning algorithm, hence we installed Python 3 in our Raspberry Pi. Tensorflow occupies about 1 GB of our microSD cards, and it is a library whos main focus is deep learning. Because this library consumes a large amount of resources, executing tensorflow in our Raspberry Pi can be slow and it should not be expected to get fast results. Our small embedded device is only be able to deploy the most common models. According to qengineeding.eu, it will not be possible to train new models, or perform transfer learning. They advice to run pre-built deep learning models, conver frozen TensorFlow models to TensorFlow Lite flat buffer models.[9]

Our group worked on the hardware enviroment set up individually, therefore the Tensorflow version installed in our Raspberry Pi were 2.1 and 2.3. That came with some challenges, as our model was trained in version 2.3.1 and hence, some adjustements had to be done in order to ensure the model would predict in our Raspberry Pi. Tensorflow open-source software library has evolved and become quite large, therefore building it on a simple 32-bit machine has become a difficult task. Raspberry Pi offers a faster and smaller version of Tensorflow, TensorFlow Lite, it uses less resources as it is designed for smaller computers. We opted for the normal Tensorflow library, since it was beneficial to perform training in our laptops for higher accuracy and speed purposes. Since our training was done in our laptops, our training model json file had to be serialized in order to work on out Raspberry Pi. To serialize, we use the model structure that is initially saved in a json file, together with the weights of the model saved in .h5 file, and serialize using the data. The modification to the Raspberry Pi would not have been necessary had we had the same version of tensorlow, but as we had to work distanced, our final hardware enviroments were set up differently. Serializing complex data, such as our model, allos us to be converted to a native Python datatype and this makes it easy to render into JSON, XML, or other types. [20]
Specifications
The Raspberry Pi 3 Model B+:
- Broadcom BCM2837B0, Cortex-A53 (ARMv8) 64-bit SoC @ 1.4GHz
- 1GB LPDDR2 SDRAM
- 2.4GHz and 5GHz IEEE 802.11.b/g/n/ac wireless LAN, Bluetooth 4.2, BLE
- Gigabit Ethernet over USB 2.0 (maximum throughput 300 Mbps)
- Extended 40-pin GPIO header
- Full-size HDMI
- 4 USB 2.0 ports
- CSI camera port for connecting a Raspberry Pi camera
- DSI display port for connecting a Raspberry Pi touchscreen display
- 4-pole stereo output and composite video port
- Micro SD port for loading your operating system and storing data
- 5V/2.5A DC power input
- Power-over-Ethernet (PoE) support (requires separate PoE HAT)
Specifications
- Microcontroller nRF52840
- Operating Voltage 3.3V
- Input Voltage (limit) 21V
- DC Current per I/O Pin 15 mA
- Clock Speed 64MHz
- CPU Flash Memory 1MB (nRF52840)
- SRAM 256KB (nRF52840)
- EEPROM none
- Digital Input / Output Pins 14
- PWM Pins all digital pins
- UART 1
- SPI 1
- I2C 1
- Analog Input Pins 8 (ADC 12 bit 200 ksamples)
- Analog Output Pins Only through PWM (no DAC)
- External Interrupts all digital pins
- LED_BUILTIN 13
- USB Native in the nRF52840 Processor
- IMU LSM9DS1
- Microphone MP34DT05
- Gesture, light, proximity APDS9960
- Barometric pressure LPS22HB
- Temperature, humidity HTS221
6. Analysis
Computer vision is a fast growing field. Applications in computer vision focuses on analysing imagery data to understand past events, and in most cases they use that understanding to predict future events. Due to the high demand of powerful hardware and software for computer vision, programming languages now offer a great range of libraries to support the process. One of the greatest challenges of computer vision is the high demand in computational power, as the computer vision process requires high power for both image process and computation. According to algorithmia.com, one of the most popular languages for aritificial intelligence applications is Python, but there are also other programs such as R, Java, Scala, and Rust. The reason why Python is one of the most popular programming languages for computer vision is that they have the most user friendly syntax, largest libraries and frameworks, dynamic applicability to a large amount of AI algorithms, and is very simple to read and write. [13] Some application areas for computer visions technology are video surveillance, biometrics, automotive, photography, movie production, Web search, medicine, augmented reality gaming, new user interfaces, and many more. [15]
Python
The language used in this project is Python. One of the main reasons why computer vision process may be slow in Python is that Python has a Global Interpreter Lock (GIL), a mutex/lock that every thread must acquire before they execute code. The reason for python desingers to include a global interpreter pointer in the laguage is that python’s memory management depends on reference counting. The reference counting keeps track of how many references there are to any memory location at all times. To avoid race conditions, the python designers decided to add the global interpreter lock to the language.
Even though developers are not directly interacting with GIL when developing computer vision software, GIL can become a performance bottleneck when running multi-threaded code. Multithreaded code becomes essencial when working with real time systems, such as our gesture recognition assistant. Whenever we add references to a memory location, this counter increments or decrements. An example of the problem with this implementation is that if we try to increment local variables, we first need the semaphore lock for the memory location, hence, executing code will be to slow. To avoid race conditions on the reference counter, python always have only one thread running at a time. The second reason for this lock is that in Python, many of the libraries are accessing C libraries, which were not created with thread safety in mind. On the other hand, C libraries help the code run faster, as C is a lower level language. Since we indirectly use these C libraries, Python code will not always be thread safe, and therefore, we have just one thread running at once. This process marely gives an illusion of multi-threaded programs in Python. Multithreading in computer vision is essential, as computer vision requires a vast amount of computation. As a consequence, due to being able to access C code in python, the single-threaded code in python can be very fast, since the memory management model is simple and has this global interpreter. The trade off is that multi-threaded programs in Python are not realistically running multiple-threads.
After discussing the python memory management model, one may wonder why use python for computer vision purposes if it has such a big impact on efficiency? As discussed in the later sections, Python, while also being a clear and syntax friendly high level language, offers different libraries for machine learning, tensorflow, neural networks, and other artificial intelligence applications. Although computing power is essential in these applications, the big tradeoff is simplicity for writting code and libraries that are essential tools for applications such as our hand gesture recognition system.
OpenCV
OpenCV stands for Open Source Computer Vision Library, its applications are mainly for computer vision and machine learning purposes. Accorging to opencv.org, the library offers more than 2500 obtimized algorithms. The set of algorithms offered by openCV can be applied “to detect and recognize faces, identify objects, classify human actions in videos, track camera movements, track moving objects, extract 3D models of objects, produce 3D point clouds from stereo cameras, stitch images together to produce a high resolution image of an entire scene, find similar, images from an image database, remove red eyes from images taken using flash, follow eye movements, recognize scenery and establish markers to overlay it with augmented reality”. [16] Because of the broad offereing of openCV, we decided to use this popular set of libraries for our gesture based embedded system, which aims to detect hand gestures to trigger desired behaviour in our computer.
TensorFlow
To install TensorFlow, instead of installing from scratch, we used a short-cut provided by qengineering.edu. The installation process uses a Google software installer called Bazel, which generates a wheel. A Bazel is an open source build/test tool, it can be comparable to Make, Mave, and Graddle. Bazel is a highlevel build language that “supports projects [in] multiple languages and builds outputs for multiple platforms”. [12] A wheel is part of the Python ecosystem and helps make installations faster and stable in the package distribution process. [11] If we had opted for installing TensorFlow from scratch in the Rpi3, the process would have taken many hours and we would have generated many intermediate files that would have taken to much spaced in the SD memory card. [9]
Python Image Recognition
Our project makes use of the OpenCV and Tensorflow libraries in Python. A description of each algorithm is described next.
Explanation to some of the main functions used from openCV library are:
cv2.read()
This method grabs, decodes and returns the next video frame. It does not take arguments and instead it gets called by the created image object. If anything goes wrong with this method call, the method returns false.
cv2.cvtColor()
This method produces an image in black and white, which allows for better prediction. Accoring to “Color-to-Grayscale: Does the Method Matter in Image Recognition?”, the main reason to use grayscale is to extract descriptors instead of operating in color images, the effect is simplification of algorithm and reduction of computation. [17]
cv2.resize()
This method scales the image being analized in each loop. This reduces the number of pixels from an image, which helps reduce the time of training a model. This is becuase, if training using neural networks for example, there is less number of input nodes that would have otherwise increased the complecity of the model. This may also be necessary to meet size requirement by a method, and openCV offers interpolation methods to resize an image. [18]
cv2.away(time_value)
This method waits for a key event. It is due to Python’s implementation of switching “threads” (as discussed in the python section) and it is necessary to process the event loop. If this method is not called, other main events, such as redraw, resize, and input event will not be called. [19]
Note: After describing the process for training input, one can see that a black background may increase the quality of our predictions.
Code Algorithm for Training in Laptop
The initial part of the code will be similar to the one ran in the Raspberry Pi, as we initially take video input using the laptop camera.
For the training data, instead of using the resource on the Internet, we take pictures of our own hand instead. We have 8 types of hand gesture and each of them take roughly 2500 each for the training. The type of the gestures we use are shown below:

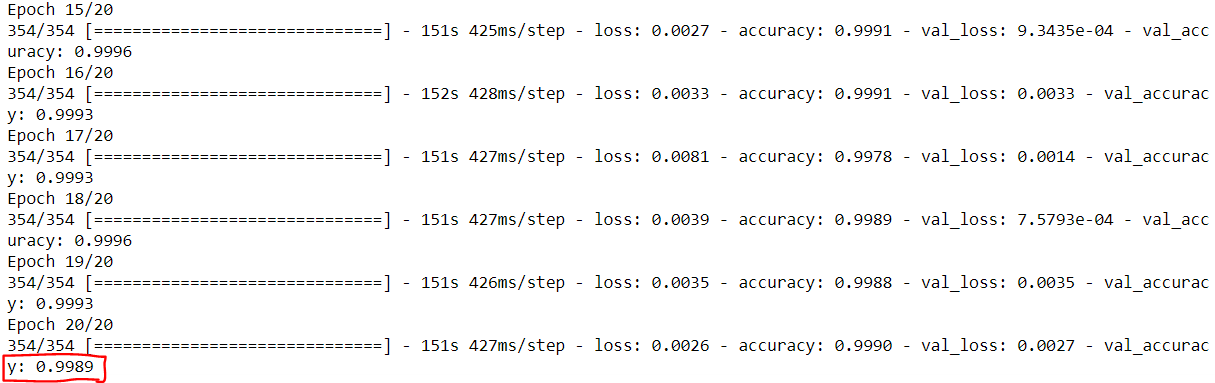
After the data are trained, next step is to train the model. Here, we use the 2D convolution nerual network. Conv2D is a multi-dimensional array that that is used to map the charateristic and classify them into different type to do recognition, after the mapping is done, MaxPooling2D will be use to simplify the calculation in the convolution layer. Then we will transform the result into an one-dimensional array with Flattern function, and Dense function to do the classification. There is also a Dropout function to avoid overfitting. Once all the step are done, we will save the trained weights into a h5 file and a json file. Now, the training model is complete, we can see that the accuracy of our model is roughly 99%.
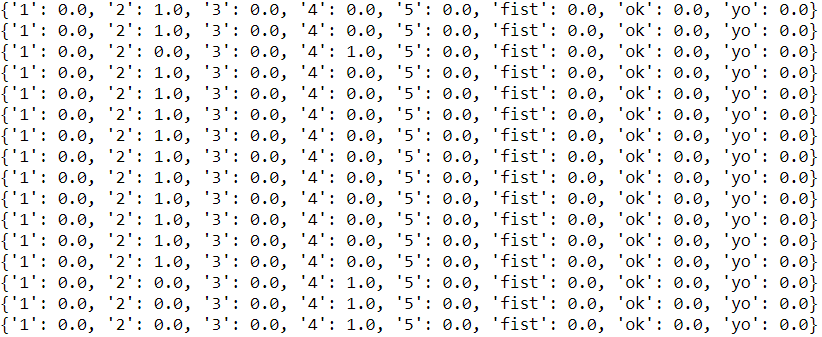
Before sending the detect_image signal to the Raspberry Pi, we also need to test our model in the test.py file. Once the webcam has detect a gesture, the model will detect which gesture is it and show 1.0 to the gesture it thinks has the highest possiblity to be the right answer. Our result is shown below and is quite accurate:
Now we are able to work with the hardware part.
Code Algorithm for Arduino
Arduino acts as a system trigger, which is a snap or a wave near the camera. This allows the image recognition model to not be constantly running, which can reduce the power consumption of the system, as well as remove the possibility of accidental transmission of unwanted commands. The two trigger methods are controlled by a threshold each:
Wave near camera: value of proximity reading < 220 (out of 256)
Snap: RMS of microphone reading > 120
Using root mean square of the microphone raw data smooths out the data just enough that it removes noisy spikes in the data but still retains the sharp waveform of the snapping sound.
When one of these thresholds are met, an trigger event is sent through the serial as output, which is read by the Raspberry Pi.
Code Algorithm for Raspberry Pi
The Raspberry Pi is the “brain” of the system: it aggregates sensor data from the Arduino and web camera, makes a decision internally, and sends keystokes to a personal computer through Bluetooth if deemed necessary.
Pseudo code of the main Python file rpi.py that runs in the Raspberry Pi 3:
Initialize bluetooth keyboard emulator, web camera, establish bluetooth connection, and identify the serial port that Arduino is using

Repopulate CNN model with the trained weights

In main loop:

    Read serial, wait for Arduino trigger event

    Read frame of picture using the cap.read() method from openCV library

    Display image using cv2.rectable() method, it takes in the image, start_point coordinate, end_point coordinate, color in form of a tuple, and thickness

    Resize and change color to greyscale using cv2.resize() and cv2.cvtColor()

    Make black and white for better predition

    In this binarization

        If the grey scale value is greater than the set-threshold-value, we set the color to the maximun grey (white)

        If the value is less than the set-threshold-value, we set colot to zero (black)

    Resize resulting image

    Predict using the model.predict() method

    Obtain highest probablility gesture, calculate patience and timeout to determine whether image capturing should continue

    If concluded with final gesture, find keystokes tied to final class prediction and send through emulated Bluetooth keyboard
Reading from Arduino Serial Output
In order to read the trigger events from the Arduino, we use the serial package in Python to do so on the Raspberry Pi. The port dev/tty* needs to be specified, and in certain cases this port changes between ttyACM0 and ttyACM1 depending on whether other USB devices are plugged in as well. Therefore, a retry mechanism is implemented in the initialization phase and main looper, where if one port can not be accessed, then the other port would be tried next. In addition, the flushing of the input buffer ensures that events that were sent while the previous recognition was happening are not counted, only new events triggered after recognition completed is counted.
Hand Gesture Recoginition with Machine Learning Model
The trained TensorFlow model is used to run prediction on the captured image from the web camera. The same preprocessing performed in training is done here as well, which include grayscaling and setting binary threshold. Two parameter, patience and timeout, define the length of how long recognition will run per triggered event. Patience is the number of consecutive readings needed to obtain final returned gesture, set to 5, in order to ensure the prediction is not a one-time fluke or the cause of a hand or object in motion. Timeout is the total number of detection attempts made before it is halted and returns to the state of observing the Arduino serial output, which is set to 1000 tries for demo purposes.
Sending Keystrokes through Bluetooth Keyboard Emulator
The following repository was referenced in sending the keystrokes through dbus. Initially, the Bluetooth service needs to be turned on and connected to the target personal computer manually. Specific keystrokes for mute/unmute video on Zoom (Command+Shift+v), mute/unmute audio on Zoom (Command+Shift+a), volume up, volume down, volume mute, closing tab/window (Command+w), and reopening most recently closed tab/window (Command+Shift+t) have been precorded and saved into pickle files, in the format of a list of keyboard events. When a final gesture prediction is obtained, it matches the specific keystroke file spcified in gestureKeystrokeMapping.json, which then runs the specificed keystroke events and broadcasts the keystrokes through Bluetooth the the personal computer. The recording of new keystrokes can be done by running utils/recordKeyEvents.py, by specifiying the saved pickle file name and typing on the Raspberry Pi during the execution of the program. The access, editing, and recording of these keystrokes and mapping can be done through SSH from the personal computer when the Raspberry Pi is connected to Wi-Fi.
Video Demo
Snap-Triggered Hand Gesture Detection to Enable Video on Zoom

Wave-Triggered Hand Gesture Detection to Mute Microphone on Zoom

Snap-Triggered Hand Gesture Detection to Close Current Window

7. Conclusion and Future Works
Our project consisted of a gesture based embedded system that acted as an assistant for user input through video camera. The Arduno contributed to our system by providing sensor data to the Raspberry Pi and therefore improving accuracy to our model. This was essential to reach our point of accuracy, as the model did not perform with high accuracy until the Arduino was added to the system. Our Raspberry Pi collected image recognition from the USB video camera and performed data analysing in real time. The connections of our system included BLE and Wi-Fi. Due to the limitations of hardware and python language speed, out team opted for training our model in our laptops and then transfering that model to our Raspberry Pi, which required to perform the process of serialization to adjut the trained model to the new enviroment.
There is always ways to make interfaces more user-friendly and effective. For this project, future works can involve more options for hand gestures, a more automated and dynamic interface, and more functionality to the system. Improving the algorithm to make it faster at detecting hand gestures would be beneficial to the system. The threshold for microphone and proximity data can be automatically adjusted based on environment during the setup phase, where background noise is measured and the user distance is taken as the baseline. The web camera also uses parameters for the binary black/white threshold that is dependent on the brightness of the room, which can be set during the setup phase to optimize for a image for the human figure. Lastly, the initialization of Bluetooth connection could be automated if a memory mechanism is implemented to auto-connect to the previous connection.
Additionally, our system works best with a single-color background to help contrast the hand and separate it from other surroundings in the frame. Getting rid of this need of a single-color backgroud would involve removing noise on the video frames by training a more complex model. One potential solution to this would be to implement an algorithm that better extracts a region of interest from an image, some functions that may be useful from OpenCV are GaussianBlur(), to remove noise from the gray-scale image, and Canny(), to obtain edges from the blurred images. More advanced signal processing techniques involving skin segmentation can also be implemented to effectively remove any background object noise and only capture the hand and fingers.
8. Contributions
Andrew Ho: Design of hardware/software system Arduino coding, integration of sensor reading, camera. Image recognition model and bluetooth keyboard emulation.
Tu Yu Hsien: Training the model using CNN method algorithm and OpenCV library. Build our own dataset(2500 images for each type). Testing the model in python. Create the signal to be able to send to the Raspberry Pi.
Jessica Bojorquez: Literature reviews on prior works. Research/documenation of project concepts and Raspberry Pi. Integration and hardware set up to test code.
9. References
[1] C.J. Cohen, G. Beach, G. Foulk “A basic hand gesture control system for PC applications” Proceedings 30th Applied Imagery Pattern Recognition Workshop (AIPR 2001). Analysis and Understanding of Time Varying Imagery
[2] “Arduino based Hand Gesture Control of Your Computer” Electronics Hub, October 06, 2019
[3] Zhou Ren, Junsong Yuan, Member, IEEE, Jingjing Meng, Member, IEEE, and Zhengyou Zhang, Fellow, IEEE “Robust Part-Based Hand Gesture Recognition Using Kinect Sensor” IEEE TRANSACTIONS ON MULTIMEDIA, VOL. 15, NO. 5, AUGUST 2013
[4] “Training a Neural Network to Detect Gestures with OpenCV in Python”, Brenner Heintz, December 18, 2018
[5] “Install OpenCV 4 on your Raspberry Pi”, Adrian Rosebrock, September 26, 2018
[6] http://meseec.ce.rit.edu/551-projects/spring2017/2-3.pdf
[7] https://www.geeksforgeeks.org/difference-32-bit-64-bit-operating-systems
[8] https://www.digitaltrends.com/computing/32-bit-vs-64-bit-operating-systems/
[9] https://qengineering.eu/install-tensorflow-2.2.0-on-raspberry-pi-4.html
[10] https://www.raspberrypi.org/products/raspberry-pi-3-model-b-plus/
[11] https://realpython.com/python-wheels/
[12] https://www.bazel.build/
[13] https://algorithmia.com
[15] Pulli, Kari “Realtime Computer Vision with OpenCV” AMCQUEUE, 2012
[16] https://opencv.org/about/
[17] Kanan, Christopher “Color-to-Grayscale: Does the Method Matter in Image Recognition?”. PLOS ONE. January 10, 2012.
[18] https://www.geeksforgeeks.org/image-resizing-using-opencv-python/
[19] https://docs.opencv.org/2.4/modules/highgui/doc/user_interface.html?highlight=waitkey#waitkey
[20] https://www.django-rest-framework.org/api-guide/serializers/
[21] https://github.com/quangthanh010290/BL_keyboard_RPI